 Photo From workexaminer
Originally Posted On: https://www.workexaminer.com/how-to-block-facebook.html
Social media websites can be a huge waste of time, especially in the corporate environment and at home. There are dozens of social websites, and Facebook is one of the most popular and widespread. In order to increase productivity and avoid spending extra time on the Internet, there might be a need for blocking certain websites and Facebook specifically.
There are different ways of blocking websites depending on the equipment and system software you are using. You can forbid loading Facebook on a PC at home or in the office. The same holds for mobile phones, tablets, and other devices. In this guide, we will go through the methods of prohibiting Facebook step by step.
Blocking Facebook on Windows Software
The most common operating system is Windows. Your workplace will most likely have computers with Windows installed, and here is our guidance on banning Facebook without additional applications and plugins. This technique will prevent Facebook from loading:
1. Opening the “Hosts” file on your PC
For working with this file, it will be necessary to be an Administrator of the profile you are using.
- Run the Notepad as an Administrator;
- Press the “File” button and afterward proceed to “Open”;
- Locate the “Hosts” document via opening the Computer and Hard Disc folders after that. Next, you will have to open such folders: “Windows”, “System32”, “drivers” and finally “etc”;
- Select “All files” instead of “Text Documents”;
- Make the “Hosts” document open to editing. In order to do this, it will be necessary to go to the document’s Properties, the Security tab, then Edit and then to allow Full control;
- Now you can open the “Hosts” document without trouble.
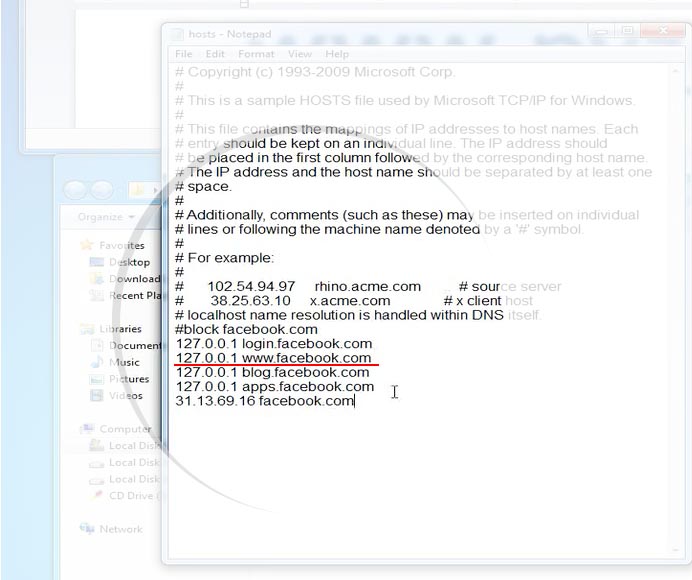
2. Scroll through all the text in the “Hosts” file and put the cursor on the line below. You might have to press Enter to occupy the free bottom line;
3. Enter the necessary IP address 127.0.0.1 and press the Tab button on your keyboard;

4. After that, you can type in all the necessary websites you need to prohibit. Write the following website after the IP address: facebook.com;
5. It is also possible to block the mobile version of the webpage in order to steer clear of entering the site. Write the usual Facebook address and add an “m.” before it;
6. Save the new “Hosts” file instead of the old one:
- Press the “File” button and choose “Save as”;
- Select “All files” instead of “Text documents”;
- Select the “Hosts” document and save it.
7. Reboot your PC. After loading back, the IP addresses of Facebook pages will be banned and impossible to access from this computer.
Blocking Facebook on Macintosh OS
If you are an Apple user or your working place is equipped with Mac computers, then you will need to do the following steps to block Facebook:
1. Open the “Hosts” file on Mac
In order to open it, you will need to have the rights of the Administrator.
- Press the “Spotlight” button;
- Insert the word “terminal” and click on it;
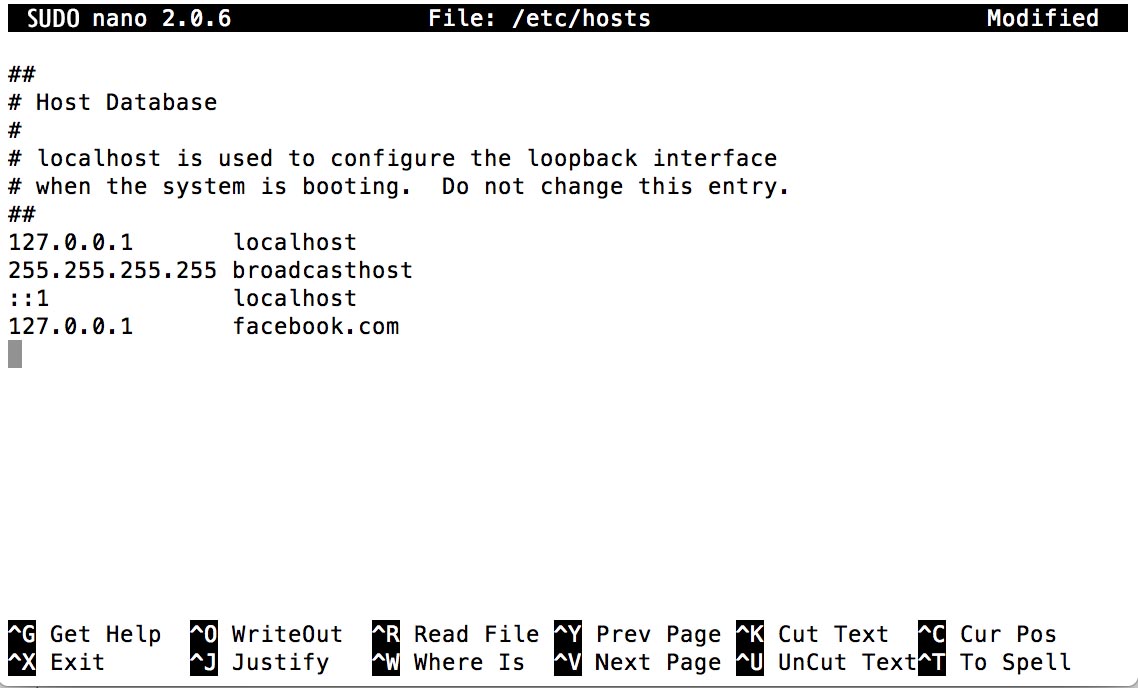
- Insert the “sudonano/etc/hosts” and click the “Return” button;
- Insert a passcode for this account.
2. Place the cursor on the bottom line of the file. You can scroll down or press the “Down” button until the cursor is on the separate free line;

3. Insert the IP address 127.0.0.1 and press the Tab button;
4. After that, you can type in all the necessary webpages you want to ban. Write the Facebook page address here;
5. You can also block the mobile version of the site to be on the safe side. Write the usual Facebook address and add an “m.” before it;
6. Save the edited “Hosts” file in order to replace the old one;
- Press the “Control” and “X” buttons simultaneously;
- After that, press the “Y” button;
- Press the “Return” button.
7. Reboot your computer. You can turn it off completely and turn on again or restart it. After rebooting, Facebook should be blocked from this device.
Blocking Facebook on iPhone and iPad
Social media websites are often accessed from mobile phones and tablets. Blocking a specific website on a computer is not enough because almost everyone has Internet access from their smartphones and tablets. To prevent someone from going on Facebook completely, you will have to follow these steps on Apple devices:
-
- Press the “Settings” button on your iPhone or iPad;
- Press the “General” button to access the general settings;
- Select the “Restrictions” option from the list;
- Insert the existing restrictions password. It should consist of four numbers. If you have not set the restrictions password yet, you will need to turn on Restrictions and create a brand new password;
- Press the “Apps” menu and disable the “Installing Apps” option. It will make downloading applications from the App Store no longer possible;
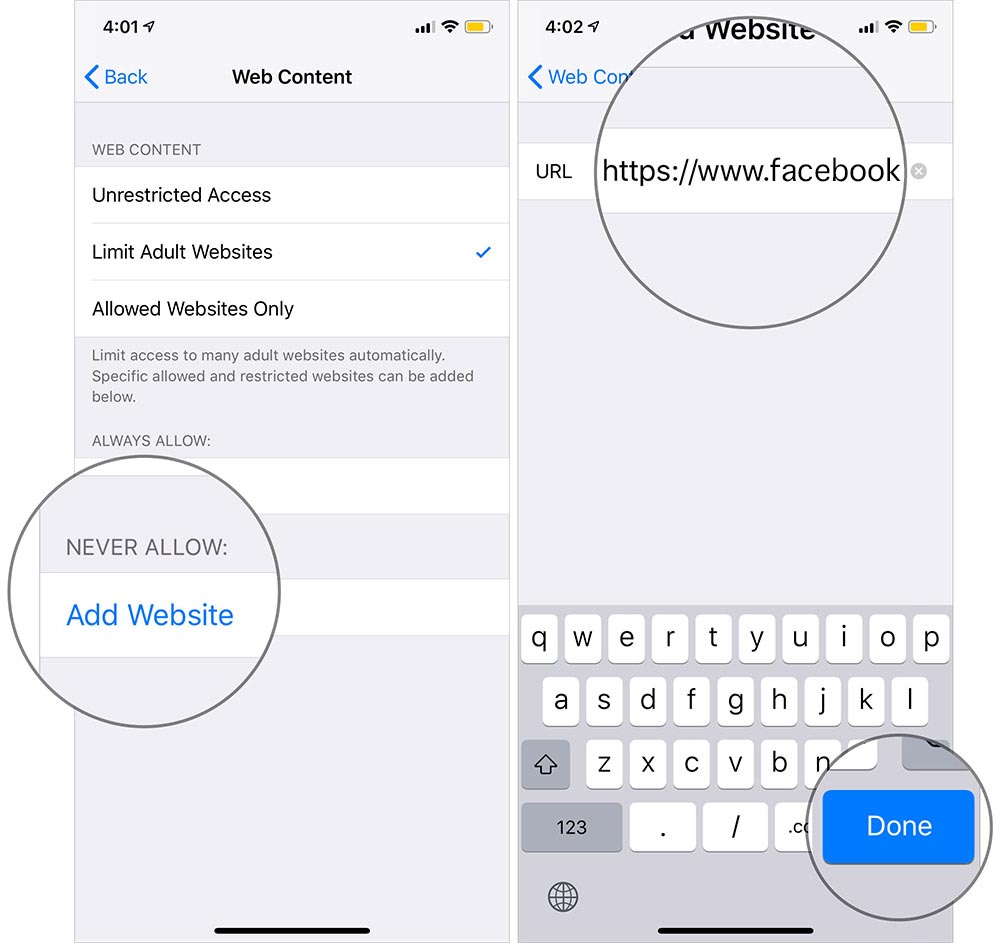
- Find the “Websites” menu and open it up;
- Select the “Limit Adult Content” option in order to forbid any adult content on your gadget;
- Scroll down and look for the “Never allow” settings. Press “Add a new Website” button;

- Insert the necessary address of a website you want to block. In this case, we want Facebook’s page address to be forbidden;
- Close the settings and go to the Home screen. This will save your new settings and prevent accessing Facebook from a mobile browser like Google Chrome, Safari, Opera, and others;
- In case you have the Facebook application, you will need to delete it. The restriction options do not affect special applications designed for social media websites.
· (Press the Facebook application button and hold it. When the “X” symbol appears, press on it and delete the application from your device. It will be impossible to install it once again because downloads from the store are forbidden as well.) - Make sure to delete all other browsers on your iPhone or iPad. The most common and reliable browsers like Google Chrome, Safari, and some others will obey the restriction settings and ban Facebook. Yet, unreliable and unknown browsers will not be influenced by these settings, which is why you will need to delete them. In order to do so, press the browser icon and hold it. Then press the “X” symbol and delete it;
After taking all these steps, there will be no ways of accessing Facebook from your iPhone or iPad.
Blocking Facebook on Android Smartphones
If you have an Android gadget, there are plenty of options for blocking unwanted websites. However, all of them require blocking the website addresses via the browser you are using or with the help of a designated application. Here are some of the methods you can use:
Block Facebook on Android with Firefox
In case you are using the Firefox browser, you can block a specific website via its options:
- Open up the browser and go to its settings;
- Select “Browse for Add-ons” and look for the “Block Site” or similar plugins;
- Add the plugin of your choice to the Add-ons of your browser;
- Go to the settings once again and open your Add-ons. Select the necessary plugin from there and open it;
- In the options of the plugin, you can insert the website addresses you want to forbid. All the other features depend on the plugin you are using.
Block Facebook on Android with Google Chrome
You can search for plugins in the Chrome browser, much like with Firefox. Another option is installing a separate application, which can influence the way Chrome works. One of the apps that can work well with Chrome on Android is Kaspersky SafeKids. It is primarily designed for child protection on the Internet; however, it can be used for blocking unwanted websites and content as well.
Blocking Facebook with Work Examiner
Even though it is possible to prohibit websites on a PC without downloading additional software, the process takes quite a lot of time and it is inefficient for blocking more than one website. Work Examiner becomes a handy tool that will make blocking websites and monitoring their activity much easier.
Downloading and setting it up takes a few seconds. The prohibiting itself is also an easy process, which will allow managing all the necessary websites right away. In addition, it has a variety of other useful features, such as blocking whole groups of websites, supervising the time spent on specific webpages and warning a user in case of him going to a forbidden website. This will be handy if you want to prevent accessing social media webpages altogether or to allow only a certain amount of time spent on these webpages. However, if you need only to block Facebook, this application does not occupy a lot of space and works perfectly for blocking one specific website.
In order to prevent access to Facebook through this software, you will have to take three simple steps:
Install Work Examiner
Work Examiner may be installed in your network in several minutes. See installation notes


Enable https filtering
Facebook.com is using https protocol by default. Work Examiner allows to capture and block secure connections – just enable https filtering in Client Options
Set up a web filter rule
Create a web blocking rule using facebook.com* URL mask.
- Apply the rule by hours, weekdays, users, computers, groups.
- Limit the time allowed on the Facebook per day.
- Make it block, redirect andor send e-mail alerts.
- Web filtering technology is standalone and independent from
the Internet connection type


Done!
Facebook.com cannot be accessed more from the target PC(s)
This application is recommended for both private use and installation in a company. Even if you need to block a single website, you will not have to forbid it on every single computer there is. You will have to locate the software on each computer and select a PC to be the main one. From it, you can handle filtering rules and monitor all the activities regarding Internet usage.
Explanation on how to block Facebook access on a network
Software installation
We have already explained above the initial installation process but now let us get a bit more details. There are two main versions of Work Examiner: Standard and Professional. The Standard version implies that only one administrator will have control over the network, and will be able to block Facebook in particular. All data about attempts to access the blocked Facebook website is stored in the cloud. The Professional package obviously has a wider range of functions and stores data in special storage. Choose which one to install depending on your budget and the number of employees.
Turning on SSL filtering
Work Examiner gives you control over Internet traffic in the form of https filtering. This filter checks all https commands and data, and blocks the ones you have indicated. Facebook.com operates on the corresponding protocol by default.
Setting up a web filter rule
Your next step is to create a Facebook blocking rule using the URL mask. It can be done just by copying the Facebook URL and pasting it into the WE dashboard. Press Add and Facebook will be blocked instantaneously. You can adjust this rule according to your preferences (hours, users, computers, etc.)
Enjoy!
Having performed all these steps correctly, you will block access to Facebook on all browsers (Google Chrome, Firefox and so on) and personal computers of any capacity. From now on, if an employee tries to access Facebook during business hours, he or she will get the notification or will be redirected to the company’s policy webpage.
Eliminate the annoying problem of employees’ lack of focus caused by social media with the help of Work Examiner. Buy the Standard version that will satisfy all your basic requirements, or the Professional one that contains the full package of options. All trials comes for free!